Table of Contents
Introduction
Connected App Steps in Salesforce
Connected App Steps in OutboundSync
Creating a Webhook in OutboundSync
Testing the Webhook
Verify activity in Salesforce
Next steps
Introduction
To enable seamless data synchronization between Salesforce and OutboundSync, you’ll need to create a Connected App in Salesforce.
This guide will walk you through the steps to set up a Connected App, link it to OutboundSync, and configure the webhook to sync data from Smartlead.
By following these steps, you’ll ensure that OutboundSync can integrate with your Salesforce platform smoothly and securely.
Connected App Steps in Salesforce
Before beginning, please note: You must have System Platform User permissions. Read more about setting up permissions here.
- Login to Salesforce:
- Go to your Salesforce portal and log in.
- Access Setup:
- Click the gear icon in the top right corner to access the Setup Menu.
- Click Setup

- Navigate to App Manager:
- On the left-hand sidebar, under Platform Tools, go to Apps > App Manager.
- If you do not see the App Manager option, contact your Salesforce Admin. You must have System Platform User permissions. Read more about setting up permissions here.

- Create a New Connected App:
- Click New Connected App and then select Create a Connected App.


- Fill Out the Form:
- Complete the form with the following details:
- Connected App Name: OutboundSync
- API Name: OutboundSync
- Contact Email: your preferred email (does this need to be their SF email

- Check the box for Enable OAuth Settings.
- Enter the following Callback URL:
https://app.outboundsync.com/oauth/salesforce - Add the following OAuth Scopes:
- Full Access (full)
- Manage user data via APIs (api)
- Perform requests at any time (refresh_token, offline_access)

- Uncheck the box for Require Proof Key for Code Exchange (PKCE) Extension for Supported Authorization Flows
- Click Save and then Continue.
- Complete the form with the following details:
- Manage Consumer Details:
- Under API (Enable OAuth Settings), find Manage Consumer Details.

-
- You will receive a verification code in your email—enter it to proceed.
- Now you can view the Consumer Key and Consumer Secret.

Keep this information nearby, we will enter it into OutboundSync next.
Connected App Steps in OutboundSync
- Login to OutboundSync:
- Go to your OutboundSync portal and log in.
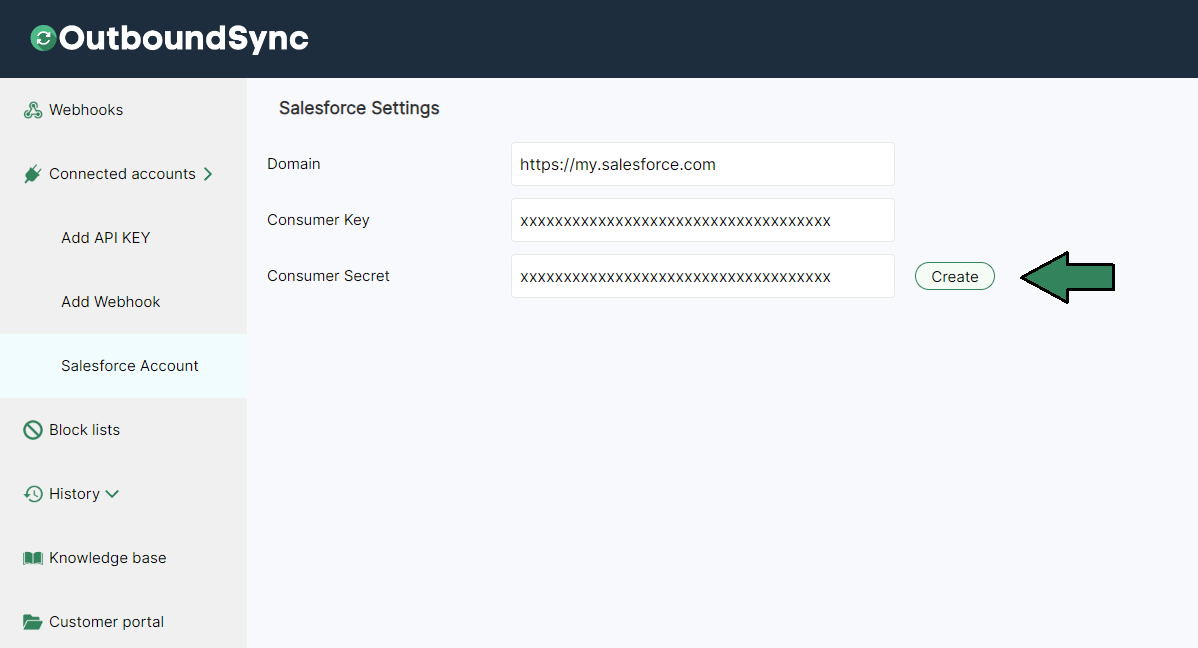
- Navigate to Salesforce Account:
- Go to Connected Accounts > Salesforce Account.

- Copy the Consumer Key and Consumer Secret from Salesforce and paste them into their respective fields in OutboundSync.
- Go to Connected Accounts > Salesforce Account.
- Find Your Salesforce Domain:
- In Salesforce, click your profile image in the top right corner and copy the Domain URL under your name.

- Enter Domain URL in OutboundSync:
- Go back to OutboundSync and enter the Domain URL, adding https:// at the beginning.
- Example: my.salesforce.com becomes https://my.salesforce.com.
- Create the Connection:
- Click Create when you’ve entered all the criteria.
- Log out of any tabs you have open for Salesforce
- Click Connect on the newly added Salesforce account in OutboundSync. This will prompt you to log in to Salesforce.

- Select Allow on the list of permissions.
- Click Create when you’ve entered all the criteria.
Creating a Webhook in OutboundSync
- Navigate to Webhooks:
- In OutboundSync, go to the Webhooks tab.
- Create a Webhook for Salesforce:
- Select Salesforce from the dropdown and click Create Webhook.

- Select Owner of the webhook. The owner is the Salesforce user that newly assigned leads, accounts, and contacts will be assigned to. This can be a person or it can be an integration user that is credited specifically for OutboundSync.
- Select Email Service. This is your Sales Engagement Platform (e.g. Smartlead, Instantly, EmailBison, or SASMail).
- Select Log Type. This is a critical choice that affects how activities are logged into your Salesforce account. This is not permanent and can be changed later.
There are two options:
- Task Object (Recommended): When writing to the task object, you can log data with a user-configurable subject line that can be used for Flows and Reports. While counterintuitive based on the name "tasks", this is the method that most integrations use in Salesforce in general.
In OutboundSync, the subject line is user-configurable. Here are a few things to keep in mind:- You can enter both custom text as well as variable snippets that will be dynamically updated based on your campaign data.
- Any custom text that's entered will be constant across all event types. The most typical use case here would be entering something to indicate the tasks are related to outbound in general or OutboundSync in particular.
- By way of example, you could append [OS] at the beginning of your task subject line to indicate it's related to OutboundSync and that text will appear at the beginning of every task.
- Salesforce limits the task subject line to 255 characters. If your subject line exceeds this, OutboundSync will cut off any excess characters to ensure the API call into Salesforce to create the task is successful.
- Task Object (Recommended): When writing to the task object, you can log data with a user-configurable subject line that can be used for Flows and Reports. While counterintuitive based on the name "tasks", this is the method that most integrations use in Salesforce in general.
-
- The latest supported snippets are in the application. They must be entered as shown in the application with brackets and spaces.
Here are some reference examples:
os_sales_engagement_platform- Your Sales Engagement Platform like Smartlead, Instantly, EmailBison, or SASMail.event_type- The webhook event type, like EMAIL_SENT, EMAIL_REPLY, LEAD_CATEGORY_UPDATED, etc.to_name- Who the email was sent to by name.to_email- Who the email was sent to by email address.from_email- Who the email was sent from by email address.campaign_name- The campaign name associated with the event. (These can be changed over time in your Sales Engagement Platform.)campaign_id- The campaign ID associated with the event. (These are immutable and are more reliable for certain reporting use cases.)subject- The subject line of the event.sequence_number- The step in the sequence of the event.
- Email Object: This object is more intuitively named and for smaller organizations, it may be preferred. The Email Object has fewer options when it comes to Flows and Reports. However the metadata provided by this object is also more clear to a user and in some cases—especially for EMAIL_SENT and EMAIL_REPLY - it is more intuitive that these be logged as emails.
- The latest supported snippets are in the application. They must be entered as shown in the application with brackets and spaces.
- Select additional endpoints. This feature is built for Smartlead users. Read more about how additional endpoints work here.
Additional options will be added as we improve our Salesforce integration.
Testing the Webhook
- Select Sync Test:
- Under your created webhook, select Sync Test to begin testing.

- Choose the webhook type (e.g., Email Sent) and modify the data as needed.

- Run the Test:
- Click Test Sync to execute the webhook test.

- Click Test Sync to execute the webhook test.
Verify activity in Salesforce
First, go to Salesforce and search for the contact used in the test. 
Next, open the contact in Salesforce and view their Activity to ensure everything synced correctly.


That's it! You've successfully set up your Salesforce-Webhook data sync in OutboundSync.
Next steps
To finish the process, add the newly created OutboundSync webhook URL into your Sales Engagement Platform.
It is critical that you properly configure your webhook in your Sales Engagement Platform to sync live campaign data to OutboundSync and ultimately Salesforce.
Find instructions on how to do with with the following supported platforms: